はじめに
2020年度入社のiOSエンジニア、澁谷太智です。 今回は、制約をコード上で設定する方法についてご紹介しようと思います。
コード上で制約をつけられることは知っていましたが、記述量が多くて難しそうという印象が強く、なかなか手をつけられずにいました。研修中の課題で、コード上で制約をつける機会があったので、その時調べたことを記事にしようと思いました。
では、制約の付け方について、1つずつ丁寧に見ていきたいと思います。
TOC(Table Of Contents)
- NSLayoutConstraintのイニシャライザについて
- 実際に、制約をつけてみた
- AspectRatio の制約の付け方
- NSLayoutAnchorを使う利点・注意点
- 最後に
- 参考サイト一覧
作業環境
- macOS Catalina
- version 10.15.5
- Xcode
- version 12.3
- iPhone12 Pro Max (シミュレーター)
- iOS 14.3
- Swift
- version 5.3.2
NSLayoutConstraintのイニシャライザについて
Appleの公式ドキュメントが参考になるので、ご紹介します。 Apple Developer – Programmatically Creating Constraints
さらに、その他のConstraint (LabelのHaggingなど) に関する情報が載っている公式ドキュメントもご紹介します。 Apple Developer – Anatomy of a Constraint
まず、NSLayoutConstraintのイニシャライザを見てみます。少し見易くしたものを以下に記載します。
convenience init(
    item view1: Any,
    attribute attr1: NSLayoutConstraint.Attribute,
    relatedBy relation: NSLayoutConstraint.Relation,
    toItem view2: Any?,
    attribute attr2: NSLayoutConstraint.Attribute,
    multiplier: CGFloat,
    constant c: CGFloat
)
項目がてんこ盛りすぎて、私はスッとページを閉じました。
ここで、Appleの公式ドキュメントに載っている画像を見てみます。
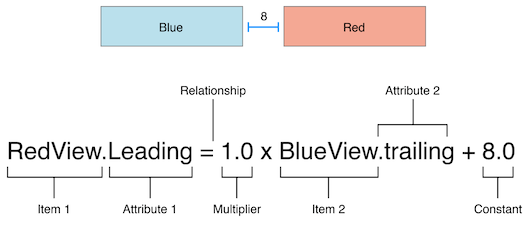
(引用:Apple Programmatically Creating Constraints)
この画像を見ても、初めて見たときは、なんのことやらでした。
では、イニシャライザとStoryboard上の設定を見比べてみましょう。
以下の画像は、制約をクリックした際に右端に表示される画面です。
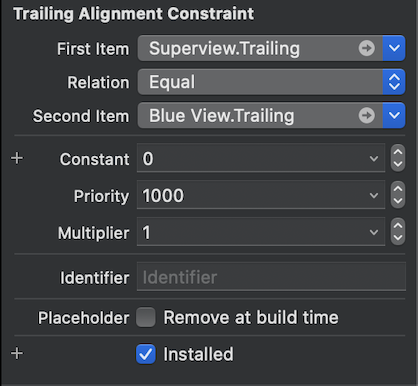
似たような項目があります。1つずつ見ていきましょう。
First Item
イニシャライザでは、
item view1: Any と attribute attr1: NSLayoutConstraint.Attribute にあたります。
item view1: Any: SuperViewattribute attr1: NSLayoutConstraint.Attribute: Trailing
Relation
イニシャライザでは、
relatedBy relation: NSLayoutConstraint.Relation にあたります。
relatedBy relation: NSLayoutConstraint.Relation: Equal
Second Item
イニシャライザでは、
toItem view2: Any? と attribute attr2: NSLayoutConstraint.Attribute にあたります。
toItem view2: Any?: BlueViewattribute attr2: NSLayoutConstraint.Attribute: Trailing
Constant
イニシャライザでは、
constant c: CGFloat にあたります。
Multiplier
イニシャライザでは、
multiplier: CGFloat にあたります。
こう見比べていくと、イニシャライザで何を設定しているのか読み取りやすくなると思います。 Apple公式ドキュメントの画像と比較すると、さらに理解が深まるのではないかと思います。 では、実際に制約をつけてみましょう。
実際に、制約をつけてみた
パターン1 NSLayoutConstraint のイニシャライザを使用した場合
import UIKit
final class ViewController: UIViewController {
private let newView: UIView = UIView()
override func viewDidLoad() {
super.viewDidLoad()
//AutoresizingMask を Auto Layout変換 無効化
newView.translatesAutoresizingMaskIntoConstraints = false
view.addSubview(newView)
let leading = NSLayoutConstraint(
item: newView,
attribute: .leading,
relatedBy: .equal,
toItem: view,
attribute: .leading,
multiplier: 1,
constant: 0
)
let trailing = NSLayoutConstraint(
item: newView,
attribute: .trailing,
relatedBy: .equal,
toItem: view,
attribute: .trailing,
multiplier: 1,
constant: 0
)
let top = NSLayoutConstraint(
item: newView,
attribute: .top,
relatedBy: .equal,
toItem: view,
attribute: .top,
multiplier: 1,
constant: 0
)
let bottom = NSLayoutConstraint(
item: newView,
attribute: .bottom,
relatedBy: .equal,
toItem: view,
attribute: .bottom,
multiplier: 1,
constant: 0
)
// 制約を有効化します
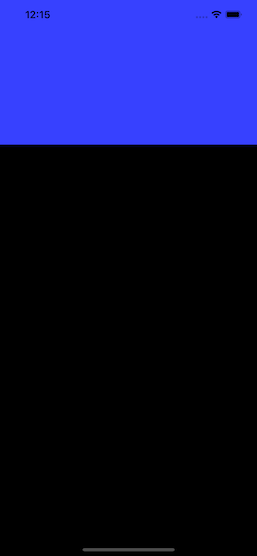
NSLayoutConstraint.activate([leading, trailing, top, bottom])
view.backgroundColor = .black
newView.backgroundColor = .blue
}
}
パターン2 NSLayoutAnchor を使用した場合
import UIKit

final class ViewController: UIViewController {

    private let newView: UIView = UIView()

    override func viewDidLoad() {
        super.viewDidLoad()

        //AutoresizingMask を Auto Layout変換 無効化
        newView.translatesAutoresizingMaskIntoConstraints = false

        view.addSubview(newView)

        let leading = newView.leadingAnchor.constraint(equalTo: view.leadingAnchor, constant: 0)
        let trailing = newView.trailingAnchor.constraint(equalTo: view.trailingAnchor, constant: 0)
        let top = newView.topAnchor.constraint(equalTo:  view.topAnchor, constant: 0)
        let bottom = newView.bottomAnchor.constraint(equalTo: view.bottomAnchor, constant: 0)

        //制約を有効化します
        NSLayoutConstraint.activate([leading, trailing, top, bottom])

        view.backgroundColor = .black
        newView.backgroundColor = .blue
    }
}
2つの方法、どちらで制約を付けても結果は同じです。パターン2に関してはiOS9から使えるようになりました。 コード量が減って、パターン2の方が見やすいですね。
上記2つのコードで、制約の有効化に、
NSLayoutConstraint.activate([NSLayoutConstraint]) を使用しています。
公式ドキュメントを見てみると、
Typically, using this method is more efficient than activating each constraint individually.
個別に制約を有効化するより、
NSLayoutConstraint.activate([NSLayoutConstraint]) を使用した方が効率が良いと書いてあります。
複数の制約を設定するときは、
isActive で個々に設定するのではなく、NSLayoutConstraint.activate([NSLayoutConstraint]) で一気に設定するようにしましょう。
スクリーンショット

※ translatesAutoresizingMaskIntoConstraints について
AutoresizingMaskの設定値をAuto Layoutの制約に変換するかどうかを決めるBool値です。
Auto Layout登場以前はAutoresizingMaskという仕組みで、ビューの動的なサイズ変更を実現していたそうです。
このBool値を予め
false にしておかないと、自分で設定した制約とコンフリクトを起こしてしまいます。
(参考サイト: Qiita – Auto Layoutをコードで書いて学ぶ(Swift 2.2))
AspectRatio の制約の付け方
本記事では、 AspectRatio (縦 : 横)9 : 16 で設定しようと思います。
パターン1 NSLayoutConstraint のイニシャライザを使用した場合
let ratio: CGFloat = 9 / 16

let aspectRatio: NSLayoutConstraint = NSLayoutConstraint(
    item: newView,
    attribute: .height,
    relatedBy: .equal,
    toItem: newView,
    attribute: .width,
    multiplier: ratio,
    constant: 0
)

aspectRatio?.isActive = true
item、toItemには、AspectRatio を設定したいViewを記述します。attributeは、縦横比なので、widthとheightを設定します。- 縦:横(縦 / 横)で計算したい場合
itemのattributeはheighttoItemのattributeはwidth
- 縦:横(縦 / 横)で計算したい場合
multiplierには、比率の計算結果を入力します。
コード
import UIKit

final class ViewController: UIViewController {

    private let newView: UIView = UIView()

    override func viewDidLoad() {
        super.viewDidLoad()

        newView.translatesAutoresizingMaskIntoConstraints = false

        view.addSubview(newView)

        let leading = newView.leadingAnchor.constraint(equalTo: view.leadingAnchor, constant: 0)
        let trailing = newView.trailingAnchor.constraint(equalTo: view.trailingAnchor, constant: 0)
        let top = newView.topAnchor.constraint(equalTo:  view.topAnchor, constant: 0)

        let ratio: CGFloat = 9 / 16

        let aspectRatio = NSLayoutConstraint(
            item: newView,
            attribute: .height,
            relatedBy: .equal,
            toItem: newView,
            attribute: .width,
            multiplier: ratio,
            constant: 0
        )

        // 制約を有効化
        NSLayoutConstraint.activate([leading, trailing, top, aspectRatio])

        view.backgroundColor = .black
        newView.backgroundColor = .blue
    }
}
上記コードでは、大きさをSuperViewより小さいサイズに設定する為、BottomAnchor を設定していません。設定してしまうと、警告文が表示されます。 以下がBottomAnchorを設定した上で、AspectRatioを設定した時に出る警告文です。
2020-12-24 12:26:32.216315+0900 ForConstraintDescribing[3973:8932315] [LayoutConstraints] Unable to simultaneously satisfy constraints.
    Probably at least one of the constraints in the following list is one you don't want.
    Try this:
        (1) look at each constraint and try to figure out which you don't expect;
        (2) find the code that added the unwanted constraint or constraints and fix it.
(
    "<NSLayoutConstraint:0x60000208caa0 H:|-(0)-[UIView:0x7fa06b807000]   (active, names: '|':UIView:0x7fa068c08630 )>",
    "<NSLayoutConstraint:0x60000208cd20 UIView:0x7fa06b807000.trailing == UIView:0x7fa068c08630.trailing   (active)>",
    "<NSLayoutConstraint:0x60000208cd70 V:|-(0)-[UIView:0x7fa06b807000]   (active, names: '|':UIView:0x7fa068c08630 )>",
    "<NSLayoutConstraint:0x60000208cdc0 UIView:0x7fa06b807000.bottom == UIView:0x7fa068c08630.bottom   (active)>",
    "<NSLayoutConstraint:0x60000208ce10 UIView:0x7fa06b807000.height == 0.5625*UIView:0x7fa06b807000.width   (active)>",
    "<NSLayoutConstraint:0x600002090320 'UIView-Encapsulated-Layout-Height' UIView:0x7fa068c08630.height == 926   (active)>",
    "<NSLayoutConstraint:0x600002090690 'UIView-Encapsulated-Layout-Width' UIView:0x7fa068c08630.width == 428   (active)>"
)

Will attempt to recover by breaking constraint
<NSLayoutConstraint:0x60000208ce10 UIView:0x7fa06b807000.height == 0.5625*UIView:0x7fa06b807000.width   (active)>

Make a symbolic breakpoint at UIViewAlertForUnsatisfiableConstraints to catch this in the debugger.
The methods in the UIConstraintBasedLayoutDebugging category on UIView listed in <UIKitCore/UIView.h> may also be helpful.
パターン2 NSLayoutAnchor を使用した場合
let ratio: CGFloat = 9 / 16

newView.heightAnchor.constraint(equalTo: newView.widthAnchor, multiplier: ratio).isActive = true
縦 : 横にしたいので、メソッドを呼び出す側を
heightAnchor 、メソッドの引数の equalTo に widthAnchor を指定します。
コード
import UIKit

final class ViewController: UIViewController {

    private let newView: UIView = UIView()

    override func viewDidLoad() {
        super.viewDidLoad()

        newView.translatesAutoresizingMaskIntoConstraints = false

        view.addSubview(newView)

        let leading = newView.leadingAnchor.constraint(equalTo: view.leadingAnchor, constant: 0)
        let trailing = newView.trailingAnchor.constraint(equalTo: view.trailingAnchor, constant: 0)
        let top = newView.topAnchor.constraint(equalTo:  view.topAnchor, constant: 0)

        let ratio: CGFloat = 9 / 16

        let aspectRatio = newView.heightAnchor.constraint(equalTo: newView.widthAnchor, multiplier: ratio)

        // 制約を有効化
        NSLayoutConstraint.activate([leading, trailing, top, aspectRatio])

        view.backgroundColor = .black
        newView.backgroundColor = .blue
    }
}
どちらのパターンでも結果は同じになります。 AspectRationの設定の場合でも、パターン2の方がコードが簡潔で見やすいです。 以下が実行結果のスクリーンショットになります。
スクリーンショット
NSLayoutAnchorを使う利点・注意点
NSLayoutAnchorの公式ドキュメントを見てみると。利点と注意点についての記載があります。
利点
以下、公式ドキュメント記載のコードと、説明文です。
コード
// Creating constraints using NSLayoutConstraint
  NSLayoutConstraint(item: subview,
                     attribute: .leading,
                     relatedBy: .equal,
                     toItem: view,
                     attribute: .leadingMargin,
                     multiplier: 1.0,
                     constant: 0.0).isActive = true

  NSLayoutConstraint(item: subview,
                     attribute: .trailing,
                     relatedBy: .equal,
                     toItem: view,
                     attribute: .trailingMargin,
                     multiplier: 1.0,
                     constant: 0.0).isActive = true

  // Creating the same constraints using Layout Anchors
  let margins = view.layoutMarginsGuide

  subview.leadingAnchor.constraint(equalTo: margins.leadingAnchor).isActive = true
  subview.trailingAnchor.constraint(equalTo: margins.trailingAnchor).isActive = true
説明文
As you can see from these examples, theNSLayoutAnchorclass provides several advantages over using theNSLayoutConstraintAPI directly.
- The code is cleaner, more concise, and easier to read.
- The
NSLayoutConstraint.Attributesubclasses provide additional type checking, preventing you from creating invalid constraints.
上記説明文には、以下のように書かれています。
例を見てわかるとおり、
NSLayoutConstraintAPIを使うよりも、NSLayoutAnchorを使うといくつかの利点があります。
- コードが綺麗になって、とても見やすくなります。
- 追加の型チェックを行います。無効な制約の作成を防いでくれます。
注意点
While theNSLayoutAnchorclass provides additional type checking, it is still possible to create invalid constraints. For example, the compiler allows you to constrain one view’sleadingAnchorwith another view’sleftAnchorsince they are bothNSLayoutXAxisAnchorinstances. However, Auto Layout does not allow constraints that mix leading and trailing attributes with left or right attributes. As a result, this constraint crashes at runtime.
NSLayoutAnchorクラスは追加の型チェックを行いますが、無効な制約を作成できてしまいます。
その例が、あるViewの
leadingAnchorともう一つのViewのleftAnchorで制約を作成した時です。どちらもNSLayoutXAxisAnchorのインスタンスなので、制約を作成することができてしまいます。
しかしながら、Auto Layoutでは、
NSLayoutConstraint.Attributeが enum の case で管理されているので、あるViewの .leading と、あるViewの .left を指定することはできません。
case .left = 1、case .leading = 5なのでエラーが出てクラッシュします。
最後に
最初は、制約をコード上で設定することに抵抗がありました。
しかしながら、1つずつ丁寧に、設定しなければいけない項目を確認すれば、何ら難しいことではありませんでした。
本記事でご紹介した、パターン1(イニシャライザ)は理解を深めるためにご紹介したものです。NSLayoutAnchorを使用すればコード量も減るので、是非パターン2をご活用ください。
少しでも理解の助けになればと思います。
最後まで記事を読んで頂き、ありがとうございました。
参考サイト一覧
- translatesAutoresizingMaskIntoConstraints について
- AspectRation NSLayoutAnchor での設定
- Quick Helpの書き方
- NSLayoutAnchorを使う利点・注意点
- 複数のNSLayoutConstraint の有効化
澁谷太智