はじめに
この記事はレコチョク Advent Calendar 2021の9日目の記事となります。
自己紹介
はじめまして、株式会社レコチョク所属の寺島です。 新卒3年目のエンジニアで、Androidアプリの開発に携わっています。
株式会社レコチョクは音楽サービスの企業という事で、唐突に音楽に関する余談です。 私は、ゲーム好き・アニメ好きが高じて、声優さんに興味があります。最近は鬼滅の刃で有名な鬼頭明里さんが気になっています。先日、鬼頭明里さんのライブにも参加してきました!
鬼頭明里さんの曲で、最近のお気に入りは「Dive to World」です。気になった方はぜひ聴いてみてください! Dive to World / 鬼頭明里
それでは本題に入っていこうと思います。
何について書くか?
Androidアプリ開発でよく使う技術のうち、 2021年度上半期で個人的に感動した技術をピックアップして記事を書きます!
目次
記事にする内容は以下の3つになります。
- Sealed Interface
- Concat Adapter
- Pager Snap Helper
Sealed Interface
どのような時に使う?
Sealed InterfaceやSealed Classなどは、複雑なクラス設計を実現する時に使用します。
今回はSealed Interfaceについて、自分が用意した図をもとに解説していきます。Kotlinでできる継承の便利な仕組みを伝えられたらと思ってます。
※今回はSealed ClassとSealed Interfaceの違いについては説明しません。また、RecyclerViewを使った事がある人に向けての解説になると思います。
使い方
とあるアプリでは楽曲に限らず動画や画像を扱えるとします。また、楽曲・動画・画像は様々なジャンルごとに分かれています。ここではアニメ・アイドル・ゲーム・ロックという4つのジャンルに分かれているとします。先述の4つのジャンルで、楽曲・動画・画像を表示できるアプリを想定して、解説を進めていきます。

表示される楽曲・動画・画像がどのジャンルであるか分かりやすくするために、それぞれのジャンルで色分けして一覧に表示したいです。この時Sealed Interfaceを使って、クラス設計をするとスマートにコードが書けることがあります。
ここでは、アニメ(Anime)・アイドル(Idol)・ゲーム(Game)・ロック(Rock)の4つでジャンル(Genre)があるとします。また、コンテンツ(Contents)は、楽曲(Music)・動画(Movie)・画像(Image)を扱っています。
先述した内容のコンテンツを一覧で見れるリストをRecyclerViewで作成したい時、各クラスを作ると以下のようになります。
〜コンテンツ(Contents)のコード〜
sealed interface Contents {
    val id: Long
    val title: String
}
〜各コンテンツクラスのコード〜
sealed interface Music: Contents {
    override val id: Long
    override val title: String
    val artist: String
    val bitrate: Long
    val duration: Long
    val size: Long
}

sealed interface Movie: Contents {
    override val id: Long
    override val title: String
    val resolution: Int
    val duration: Long
    val size: Long
}

sealed interface Image: Contents {
    override val id: Long
    override val title: String
    val isPdf: Boolean
    val size: Long
}
〜ジャンル(Genre)のコード〜
sealed interface Genre {
    val genreTitle: String
}

sealed interface Anime: Genre {
    val aNumber: Int
    override val genreTitle: String
        get() = "アニメ"
}

sealed interface Idol: Genre {
    val iNumber: Int
    override val genreTitle: String
        get() = "アイドル"
}

sealed interface Game: Genre {
    val gNumber: Int
    override val genreTitle: String
        get() = "ゲーム"
}

sealed interface Rock: Genre {
    val rNumber: Int
    override val genreTitle: String
        get() = "ロック"
}
〜動画クラスのコード〜
data class AnimeMovieImpl(
    override val id: Long,
    override val title: String,
    override val resolution: Int,
    override val duration: Long,
    override val size: Long,
    override val aNumber: Int,
): Movie, Anime

data class IdolMovieImpl(
    override val id: Long,
    override val title: String,
    override val resolution: Int,
    override val duration: Long,
    override val size: Long,
    override val iNumber: Int
): Movie, Idol

data class GameMovieImpl(
    override val id: Long,
    override val title: String,
    override val resolution: Int,
    override val duration: Long,
    override val size: Long,
    override val gNumber: Int
): Movie, Game

data class RockMovieImpl(
    override val id: Long,
    override val title: String,
    override val resolution: Int,
    override val duration: Long,
    override val size: Long,
    override val rNumber: Int
): Movie, Rock
- コンテンツは必ずIDとタイトルを持つ
- 動画はコンテンツとして扱われ、長さや解像度を持つ
- 各コンテンツは必ず4つのジャンルのうち、1つに区分される
上記のような細かい指定を、Sealed Interfaceを使って表す事ができます。
Sealed Interfaceは同時に複数個の継承を行えるので、コンテンツ(Contents)とジャンル(Genre)の両方の特徴を持つクラスを作成できます。
上記コードで示したクラスを使って、動画の一覧画面を作ります。各ジャンルごとで表示を変えるように仕様が決まっている時、Sealed Interfaceでクラスを作った事が便利だと感じます。
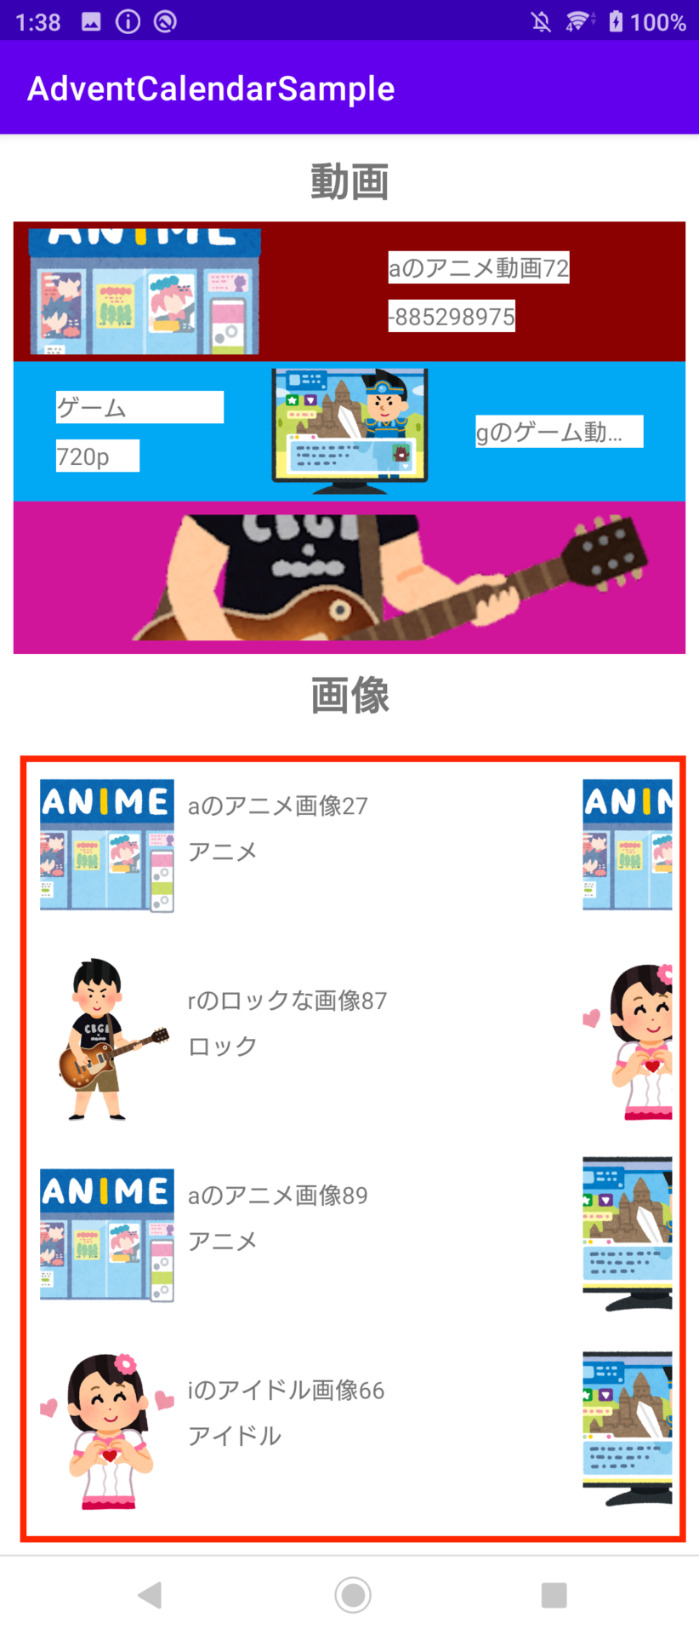
作った動画一覧画面が下のものになります。

背景色ごとで、ジャンルを区別しています。 また、ジャンルごとで動画の表示項目を変えている事が分かると思います。
画面を作るには、それぞれの動画がどのジャンルか判断して、表示用のレイアウトを指定する必要があります。ジャンルを判断してレイアウトを指定するRecyclerViewのAdapterは、下のように書けます。
〜レイアウトを決めるAdapterのコード〜
class MovieListAdapter(
    private val lifecycleOwner: LifecycleOwner,
    initialItem: List<Movie> = emptyList()
) : RecyclerView.Adapter<BindingViewHolder>() {

    private var contents: MutableList<Movie> = initialItem.toMutableList()
        set(value) {
            updateListItem(value, field)
        }

    override fun getItemViewType(position: Int): Int {
        return when (contents[position]) {
            is AnimeMovieImpl -> R.layout.list_item_anime_movie
            is IdolMovieImpl -> R.layout.list_item_idol_movie
            is GameMovieImpl -> R.layout.list_item_game_movie
            is RockMovieImpl -> R.layout.list_item_rock_movie
        }
    }

    override fun onCreateViewHolder(parent: ViewGroup, viewType: Int): BindingViewHolder {
        return BindingViewHolder(
            LayoutInflater.from(parent.context).inflate(viewType, parent, false)
        )
    }

    override fun onBindViewHolder(holder: BindingViewHolder, position: Int) {
        when (val content = contents[position]) {
            is AnimeMovieImpl -> {
                (holder.binding as ListItemAnimeMovieBinding).textTitle.text = content.title
                holder.binding.textNumber.text = content.aNumber.toString()
            }
            is IdolMovieImpl -> {
                (holder.binding as ListItemIdolMovieBinding).textTitle.text = content.title
                holder.binding.textCompany.text = content.genreTitle
            }
            is GameMovieImpl -> {
                (holder.binding as ListItemGameMovieBinding).textTitle.text = content.title
                holder.binding.textResolution.text = "${content.resolution}p"
                holder.binding.textCompany.text = content.genreTitle
            }
            is RockMovieImpl -> {
                // Adapterから指定するものは特になし
            }
        }
        holder.binding.lifecycleOwner = lifecycleOwner
    }

    override fun getItemCount(): Int = contents.size

    private fun updateListItem(
        newContents: List<Movie>,
        contents: MutableList<Movie> = this.contents
    ) {
        contents.clear()
        contents.addAll(newContents)
    }
}
Adapterの細かい内容については触れませんが、
getItemViewType やonBindViewHolder をみると、各クラスごとに処理を分けている事が分かります。
実際にクラス設計が複雑なアプリを作る際は、継承を使ってコンテンツの定義をしていくと、とても実装がスマートになる場合があります。上のコードのように、RecyclerViewのレイアウトの切り替えなども綺麗に実装できます。
メリット
- Androidで推奨されているMVVMでアプリを設計する時にModelクラスがスマートに作れる
- RecyclerViewのレイアウトの切り替えもスマートにできる
感想
最初のうちは有り難みが分かりづらかった継承ですが、コード量が増えたり、抽象的なビジネスモデルが増えた時に、有り難みが分かるようになりました。またサンプルではやってないのですが、各項目でタップ後の処理などを実装すると、さらに便利だなと感じました。
参考リンク
Concat Adapter
どのような時に使う?
1つのRecyclerView内で、セクション毎に表示する内容を変えたい時に使用します。 サンプルアプリを作っているので、そのアプリで見ていこうと思います。
今回は、楽曲と動画を一覧でみる画面を想定します。画面は以下の図のように4つのセクションで構成されてます。

1番上から順にセクションに名前をつけると、
- 楽曲ヘッダ (musicHeader)
- 楽曲一覧 (musicList)
- 動画ヘッダ (movieHeader)
- 動画一覧 (movieList)
となります。このように、1つのRecyclerView内に複数のセクションを表示したいときはConcatAdapterを使うと簡単に実装することができます。
使い方
Concat Adapterを使用する場合は、RecyclerViewのバージョンを1.2.0-alpha04以上にする必要があります。
RecyclerViewの最新の安定版は1.2.1となっているので、最新版を使います。
〜build.gradle〜
dependencies {
    ... 中略 ...
    implementation 'androidx.recyclerview:recyclerview:1.2.1'
}
RecyclerViewは、Adapterと呼ばれるデータ表示のためのクラスを必要とします。今回はAdapter内の実装については触れません。基本的にはRecyclerView1つに対して、1つのAdapterを用意する必要があります。しかし、Concat Adapterを使う時は作るセクションに合わせて、Adapterを複数作ります。ConcatAdapterは、作ったAdapterを1つにまとめる事ができます。故にConcatenate(連結する) Adapter、略してConcat Adapterと呼ばれます。
下にコードの例を示します。
〜作りたい画面のViewに関するクラス〜
val sampleMusics = Music.createSample()
val sampleMovies = Movie.createSample()

val musicHeaderAdapter = HeaderAdapter(
    getString(R.string.music),
    this@MainActivity
)
 val musicListAdapter = MusicListAdapter(
    this@MainActivity,
    sampleMusics
)
val movieHeaderAdapter = HeaderAdapter(
    getString(R.string.movie),
    this@MainActivity
)
val movieListAdapter = MovieListAdapter(
    this@MainActivity,
    sampleMovies
)
val concatAdapter = ConcatAdapter(
    musicHeaderAdapter,
    musicListAdapter,
    movieHeaderAdapter,
    movieListAdapter
)
with(binding) {
    rvContents.adapter = concatAdapter
    rvContents.layoutManager = LinearLayoutManager(this@MainActivity)
}
上のコードのようにセクションごとにAdapterを用意して、concatAdapterに渡します。最後にrecyclerViewのadapterとして、作成したconcatAdapterを渡すと期待の画面を実装できます。
楽曲用のAdapterは、先程のSealed Interfaceの話をしたときに出てきたMovieListAdapterを例として、MusicListAdapterを作っています。
動画用のAdapterは、SealedInterfaceの話の中で出てきたものと同様MovieListAdapterを使ってます。
またHeader用にもAdapterが必要になります。Header用のAdapterは下のようになります。
〜HeaderAdapterのコード〜
class HeaderAdapter(
    private val headerTitle: String,
    private val lifecycleOwner: LifecycleOwner
) : RecyclerView.Adapter<BindingViewHolder>() {

    override fun getItemViewType(position: Int): Int {
        return when (headerTitle) {
            "楽曲" -> R.layout.header_music
            "動画" -> R.layout.header_movie
            "画像" -> R.layout.header_image
            else -> throw Exception("そのヘッダーはありません")
        }
    }

    override fun onCreateViewHolder(parent: ViewGroup, viewType: Int): BindingViewHolder {
        return BindingViewHolder(
            LayoutInflater.from(parent.context).inflate(viewType, parent, false)
        )
    }

    override fun onBindViewHolder(holder: BindingViewHolder, position: Int) {
        when (headerTitle) {
            "楽曲" -> (holder.binding as HeaderMusicBinding).textHeader.text = "楽曲"
            "動画" -> (holder.binding as HeaderMovieBinding).textHeader.text = "動画"
            "画像" -> (holder.binding as HeaderImageBinding).textHeader.text = "画像"
            else -> throw Exception("そのヘッダーはありません")
        }
        holder.binding.lifecycleOwner = lifecycleOwner
    }

    override fun getItemCount(): Int = 1
}
Header用のAdapterでは引数で渡された「文字列」の内容によって、表示するレイアウトを切り替えられるような構造になっています。また、特徴的な部分としては、Headerは必ずアイテムが1つになるので、
getItemCount では1が指定されます。
ConcatAdapterを使うことで、ヘッダやリストをまとめて作りやすくなります。またHeaderAdapterのように違った内容を表示するのに1つのAdapterを使い回して表示を実装したりできるので便利です。今回は実装していないのですが、リストの下部にフッタのようなものも付けたりすることも簡単です。
サンプルアプリがあるので、そちらで試しにフッタをつけてみるのも良いかもしれません。
メリット
- 複数の異なるデザインの項目を表示するのに便利
- 実装も簡単で、Concat Adapterに対応するバージョンのRecyclerViewが入っていれば、追加でライブラリが必要ない
感想
自分はConcat Adapterを学ぶ前は、複数のセクションが存在する画面を作る時はRecyclerView内にRecyclerViewを入れ子のようにして作るしかないのかなと思ってました。しかし、Concat Adapterを使うことで、簡単に実装できる事を学びました。
参考リンク
Pager Snap Helper
どのような時に使う?
RecyclerViewをViewPagerのように実装したい時に使えます。
今回もサンプルアプリを例にして、どのような時に使えるか、みていきます。
下の画像の赤枠で囲った部分は水平にスライドが可能です。このスライドは列ごとに止まるようになってます。
下の画像は、実際の水平スライドの挙動です。この挙動はViewPagerと呼ばれるComponentと同様の挙動になっています。
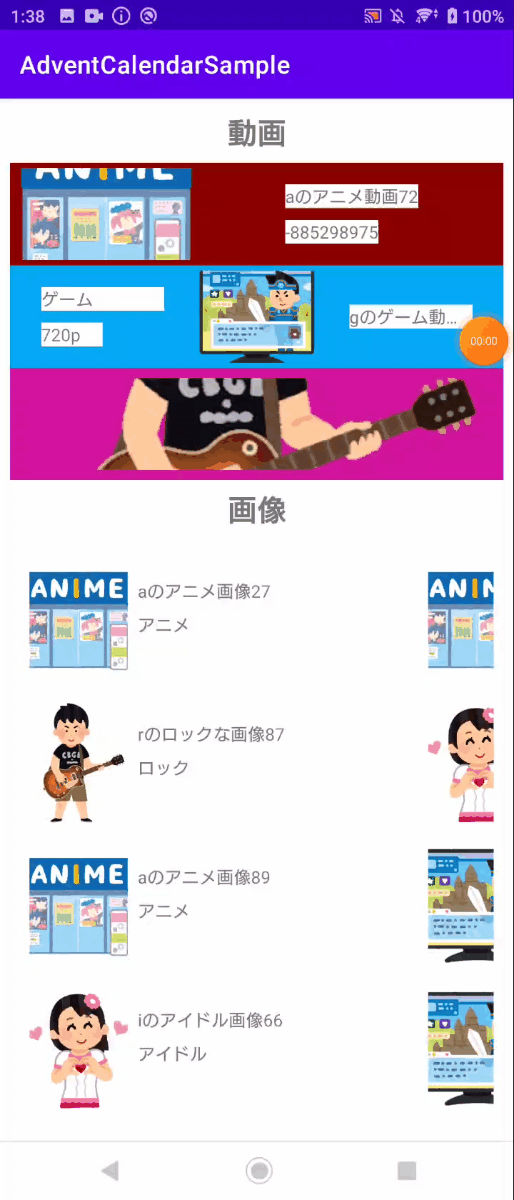
Pager Snap Helperを使うことで、説明したような水平スライドのViewを簡単に実装できます。
使い方
使い方は簡単です。RecyclerViewのAdapterやLayoutManagerを設定するタイミングでPager Snap Helperをアタッチするだけです。アタッチするだけで、ViewPager のようなRecyclerViewができます。
サンプルアプリのような見た目を作るにはReyclerViewのLayoutManagerをGirdLayoutManagerにする必要があります。実際のコードは下のようになります。
〜Pager Snap Helper (GridLayoutManagerの時)〜
val snapHelper = PagerSnapHelper()
recyclerView.onFlingListerner = null
snapHelper.attachToRecyclerView(recyclerView)
ここで
recyclerView.onFlingListerner = null
のように
onFlingListener = null を入れているのはAdapterに既にonFlingListener がアタッチされていると、クラッシュしてしまうからです。上記のようにlistenerを一旦Nullにするようにしておかないと、アプリを動作させている時にクラッシュします。
また、GridLayoutManagerとspanCountに関してはXMLファイルから設定しています。下記がXMLファイルで設定している部分になります。spanCountは1列にいくつのアイテムを並べるか指定する値になります。
<?xml version="1.0" encoding="utf-8"?>
<layout xmlns:android="http://schemas.android.com/apk/res/android"
    xmlns:app="http://schemas.android.com/apk/res-auto"
    xmlns:tools="http://schemas.android.com/tools">

    <androidx.constraintlayout.widget.ConstraintLayout
        android:layout_width="match_parent"
        android:layout_height="wrap_content"
        tools:context=".ui.MainActivity">

        <androidx.recyclerview.widget.RecyclerView
            android:id="@+id/rvImage"
            android:layout_width="match_parent"
            android:layout_height="wrap_content"
            android:layout_marginStart="8dp"
            android:layout_marginTop="8dp"
            android:layout_marginEnd="8dp"
            android:layout_marginBottom="8dp"
            android:orientation="horizontal"
            app:layout_constraintBottom_toBottomOf="parent"
            app:layout_constraintEnd_toEndOf="parent"
            app:layout_constraintStart_toStartOf="parent"
            app:layout_constraintTop_toTopOf="parent"
            app:layoutManager="androidx.recyclerview.widget.GridLayoutManager"
            app:spanCount="4"
            tools:listitem="@layout/list_item_image"
            tools:itemCount="4" />
    </androidx.constraintlayout.widget.ConstraintLayout>
</layout>
メリット
- ViewPagerを使わずに、列ごとに止まる水平スライドを簡単に実装できる
- RecyclerViewにアタッチするだけなので実装に時間がかからない
感想
Pager Snap Helperを使うことで、水平スライドのViewを真似ることができます。有名なアプリでもみる動作を、簡単に作れるので個人的に感動しました。普段自分がよく使うアプリの挙動を実装できたこともあり、より感動した内容でした。
参考リンク
- NetflixみたいなRecyclerView 【SnapHelper】
- RecyclerView の SnapHelper を調べてみた
- How to Use SnapHelper in RecyclerView in Android?
まとめ
今回は自分が2021年度上半期で学んだことで、感動した内容Best3を書きました。
- Sealed Interface
- Concat Adapter
- Snap Helper
記事中で出てきたサンプルプロジェクトはこちらから見ることができます。
特にConcat Adapterは本当に便利だなと日々実感しています。Concat Adapterのような機能があると、RecyclerViewでより複雑な画面を簡単に作る事ができます。Androidアプリ開発をしていると、RecyclerViewで複雑な画面を作る事が多く、ConcatAdapterのような機能が便利だと感じる事が多いです。
Sealed Interfaceについては、ちょっと説明するのが難しかったです。誰か1人にでも便利さが伝われば、嬉しいなと思います。
最後に
最後まで読んでいただき、ありがとうございました!
明日の記事は@y-matsukiさんの執筆です。Advent Calendar 2021の10日目になります。 お楽しみに!
寺島広
レコチョクの寺島です。
Android アプリ開発に携わっています。
アニメ、ゲームなどが好きです。